

Why Do Double Wire Lugs Fix My Two-Conductor Headaches?
2025-12-12
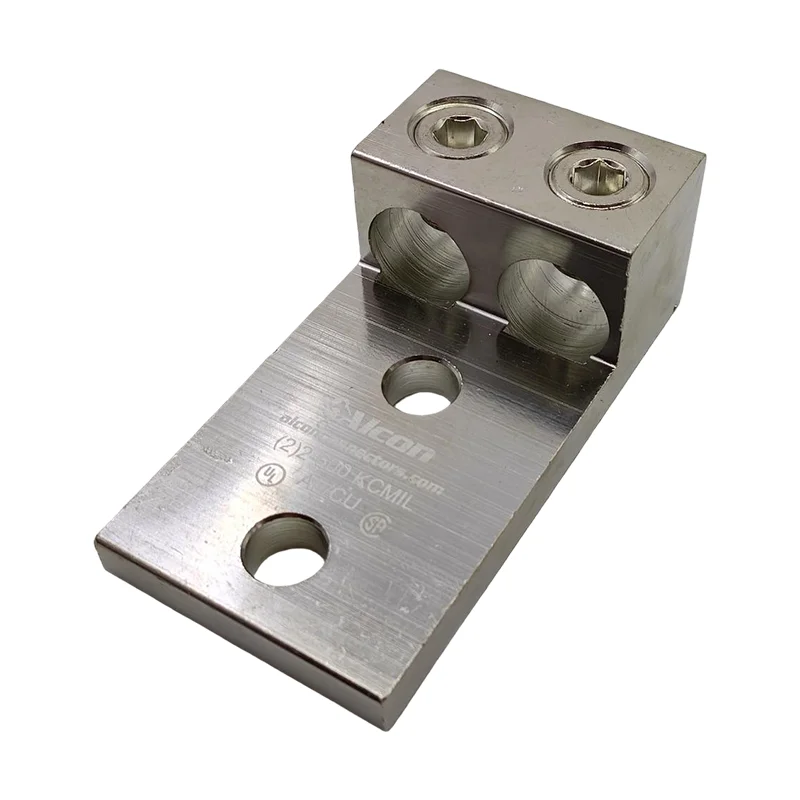
When I started consolidating parallel conductors inside cramped enclosures, I kept running into hot spots, loose set screws, and messy jumpers. That changed when I moved to Double Wire Lugs from CMKS. I’m not talking about a gimmick—I mean robust, field-friendly hardware that lets me land two conductors cleanly, repeatably, and within spec. In this post I’ll share how I size, install, and audit Double Wire Lugs so my panels look tidy, run cooler, and pass inspection the first time.
What problem am I actually solving with Double Wire Lugs?
- I need a compact way to terminate two conductors at one point without Y-splices or extra jumpers.
- I want predictable clamping force so thermal cycling doesn’t creep the joint loose.
- I’m aiming for uniform contact area to lower resistance and keep IR camera readings boring—in the best way.
- I want fewer parts to track, fewer failure points, and a cleaner service log.
With the right body alloy and screw geometry, Double Wire Lugs spread pressure evenly across both conductors. That’s why I reach for them on drives, distribution blocks, combiner boxes, and control power take-offs where space and reliability compete.
How do these differ from twin ferrules or split bolts?
- Twin ferrules shine for fine-strand control wiring, but they still need a terminal to land on. Double Wire Lugs combine the landing and clamping in one piece, rated for higher currents.
- Split bolts are versatile but bulky, harder to insulate neatly, and slower to torque consistently in tight gear. A machined lug with a set-screw window and clear gauge marks saves time.
- Barrier strips add footprint. A single Double Wire Lugs device trims parts count while keeping serviceability simple.
Which material and plating make sense for my environment?
- Aluminum body with tin plating for most power distribution—cost-effective and oxidation-resistant when prepped correctly.
- Copper body with tin or silver plating where I want max conductivity and thermal margin on dense bus bars.
- Nickel or heavy-tin topcoats for elevated temperature zones or mild corrosives.
Whichever route I choose, I pair the lug with compatible anti-oxidant on aluminum, and I keep dissimilar metals under control so galvanic issues don’t creep in. That discipline matters more once two conductors share the same interface in Double Wire Lugs.
How do I size Double Wire Lugs without guessing?
- Match conductor class and gauge: I read the marking for AWG/mm² range and strand class. Fine-strand needs lugs explicitly rated for it.
- Confirm temperature rating: 75 °C vs 90 °C changes ampacity and derating in a hurry.
- Align with torque spec: I use a calibrated driver; hand-feel is not a spec. Re-torque only if the datasheet says so.
- Check enclosure constraints: Window orientation and screw access matter more than the catalog suggests.
Where do Double Wire Lugs make my life easier?
- VFD line and load side take-offs where two feeders must land neatly.
- Solar combiner boxes and battery cabinets where parallel runs are common.
- Panelboard retrofits that need a clean, code-friendly consolidation.
- Industrial controls where I share control power to two subcircuits without extra hardware.
What installation habits keep resistance low and inspectors happy?
- I prep conductors: square-cut, strip clean, and brush oxidation off aluminum; apply antioxidant as specified.
- I seat both conductors fully—no splayed strands, no jacket under the clamp.
- I torque to the stated value and record it in the panel log. Future-me always thanks past-me.
- I perform a quick thermal scan under load during commissioning. If it’s cool and even, I’m done.
Following those steps with Double Wire Lugs has cut my rework tickets and removed the mystery from nagging hot spots.
Which quick picks help me choose faster on busy jobs?
| Use case | Preferred lug style | Conductor range | Typical torque | Why I choose it |
|---|---|---|---|---|
| Parallel feeders in a compact panel | Al-body, tin-plated Double Wire Lugs | 2× (6–2 AWG) | As marked (e.g., 45–55 in-lb) | Lightweight, easy access, solid thermal performance |
| Battery or PV combiner take-offs | Cu-body, tin-plated Double Wire Lugs | 2× (8–1/0 AWG) | As marked (e.g., 50–70 in-lb) | Higher conductivity and margin for cycling loads |
| Harsh or warm environments | Heavy-plated or nickel-topcoat Double Wire Lugs | 2× (8–4 AWG) | As marked | Better surface stability against heat and light corrosives |
Why do I keep coming back to CMKS for this hardware?
I’ve had fewer call-backs since standardizing on a short list of reliable lugs. With CMKS I get crisp markings, consistent threads, and balanced clamp geometry that treat both conductors fairly. That consistency lets me spec Double Wire Lugs with confidence across repeat builds and pass audits without drama.
What final checks should I run before I energize?
- Verify the label: conductor class, size range, and temperature rating match the print.
- Confirm enclosure clearances and bend radii—no conductor stress at the entry.
- Torque, mark, and log. If required, paint-pen the screw head for tamper visibility.
- Load the circuit and spot-check with IR; compare to adjacent terminations.
Those last minutes save hours later, and with quality Double Wire Lugs the readings are predictably uneventful.
How can we move your project forward today?
If you’re consolidating conductors or cleaning up a retrofit, I’m happy to help you match the right Double Wire Lugs to your spec and environment. Tell me your conductor class, gauge, ambient temperature, and enclosure constraints—I’ll recommend a short list that installs fast and runs cool. Ready to get specific or request a quote—contact us now and let’s get your terminations right the first time.